
If you read my last post (if not, go, go read it now, go on, I’ll wait for you) then you know I have just made casters rust under accelerated conditions using vinegar and a splash of mineral spirits. I wonder if you dipped the item in only vinegar and then let it air-dry would that also work. Then you don’t have to worry about any disposal of the mineral spirits. I’m not convinced the mineral spirits really did anything. Someone try it and let me know. Sorry – focus, Kwane, focus – this week’s post is not about my rusted casters again – it’s about my Trunk. I love this trunk. It’s an early 1900s flat-top steamer trunk.
It was a sad little piece….dirt and grime, decaying paper liner, rusted metal locks, overwhelming musty odor, and broken leather straps. It was love at first sight. Let me take a minute to emphasize just how overwhelming the musty odor was…….this trunk sat open for 5 years (in my garage)! FIVE YEARS! The smell never decreased or dissipated – and I am not exaggerating. 5 years!
Here are my trials and tribulations for this DIY project.
First – there was a lot of self-talk…..
It went something like: ” Self, How in the world am I going to revive an antique trunk? I know nothing about proper restoration techniques. But I do have a vision. Pull up your overalls and let’s go.”
Then I did the following steps: (Caution: this project is not for wimps)
- Clean trunk – my favorite cleaner to use for musty odor is vinegar (add a splash of lemon juice if you like). I use it straight up and if the material can handle light scrubbing – use a nail brush or soft scrub brush. Then follow with a damp-water-cloth-wipe-down. Repeat until all dirt is removed (cloth comes clean).
- Take break – Trunk still stinks but at least it’s clean.
- WD-40 the metal joints and locks, etc. Light steel-wool brushing.
- Remove liner (I repeat – this project is not for wimps). Now you probably don’t want to remove the liner if you are trying to retain any value. I hear this is a sure
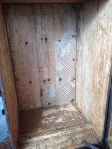
Inside of Trunk while in-process of steaming way to de-value a trunk. I took my chances. I intermittently scraped and pulled off the liner over the last 5 years. This trunk intimated me so I kept ignoring it hoping one day the liner would magically be gone. Then my husband suggested I steam it off. Genius. It took me 3 full weekends (again, not for wimps). I patiently scraped off the liner being careful not to damage the wood. Underneath the liner on the main sides was a thin cardboard type material. This was the challenging part. You’ll also find this material under most linings in antique/vintage suitcases.
- Take another break – think what to do next.
- Preserving outside of trunk: I kept trying to think how to preserve the outside especially because the leather was brittle. After reading all the labels of my paints, polyurethanes, stains, etc. – I came across shellac. What do I have to lose? It was amazing. It gave a light sheen. The leather was shiny and now had a protective coating to prevent any further cracking. The metal, canvas-like outside, and tin bottom were now also properly protected. 3 liberal coats – and all done. The shellac will also help protect it from water.
- Take another break – think how to finish inside
- Preserving inside of trunk: I like naked wood so my go-to vision is usually stain. I did a light chestnut gel stain. It brought out the character of the wood – both the grain and pothole varitions.
- Take another break – assess if I like it
- It was missing something so I added a light dusting of Behr paint, Southern Breeze, over the chestnut gel stain. It’s a soothing green/grey that added just a dab of rustic weathering.
- Attach rusted casters using nuts and bolts (you didn’t go read my last post, did you? It’s not too late…..)

Results = Timeless coffetable to store throws, games, movies; OR place at the foot of a bed to store linens or provide extra clothing storage.


Happy DIYing.
-kwane

